Well today was supposed to be our Lab lesson but half of the class did not bring their science file thus Mr Low didnt teach anything. Well it was fair yet wasnt fair. Guess like what the three musketeers said "All for one, one for all" its partly my fault as well I guess, being the secretary, I should inform the class when they need to bring their science files, which I will do in the future
Wednesday, 29 June 2011
Monday, 27 June 2011
Holidays over D:
Well the holidays are over but im rushing to complete my science homework. No time to rest anymore -.-
Sunday, 26 June 2011
Lab lesson 10 (IP10)!
This lab lesson talked about brownian motion.
The random movement of microscopic particles suspended in a liquid or gas, caused by collisions with molecules of the surrounding medium. Also called Brownian movement.

The first part of Einstein's argument was to determine how far a Brownian particle will travel in a given time interval. Classical mechanics is unable to determine this distance on account of the enormous number of bombardments a Brownian particle will undergo, roughly of the order of 1021 collisions per second.Thus, Einstein was led to consider the collective motion of Brownian particles where if ρ(x,t) is the density of Brownian particles at point x at time t then it will satisfy the diffusion equation,

where D is the diffusion coefficient. Assuming all the particles were located at the origin at the initial time t = 0, the diffusion equation has the solution,
This expression allowed Einstein to calculate the moments directly. The first moment is seen to vanish meaning that the Brownian particle is equally likely to move to the left as it is to move to the right. The second moment is, however, non-vanishing and is given by

Applications of Brownian Motion
Brownian motion is a sophisticated random number generator, based on a process discovered in plants(R. Brown; 1827) This continuous random motion of solid microscopic particles when suspended in a fluid medium is due to the consequence of continuous bombardment by atoms and molecules. It has a wide range of applications, including modeling noise in images, generating fractals, growth of crystals and stock market simulation.
Reflection
This Laboratory Lesson proved the existence of atoms and how atoms constantly move in random directions, this helps us to know more about how atoms move. Before this laboratory lesson, I thought of atoms as just stationary tiny particles of matter and after this lab lesson I realised that atoms were actually moving and not just stationary. They are even moving in a solid just that the inter-molecular forces in a solid are too strong and that this actually causes the atoms not to move as rapidly and quickly as they would do in a gas or in a liquid.
Summary
Summary
- Brownian Motion can be used other than for proving the existenc of atoms, it can also be used to formulate random numbers and stimulate a stock market
- Brownian Motion proves the existence of atoms
Lab lesson 8 (IP8)!
We also learnt about DENSITY
The mass density or density of a material is defined as its mass per unit volume The symbol most often used for density is ρ (the Greek letter rho). In some cases (for instance, in the United States oil and gas industry), density is also defined as its weight per unit volume although, this quantity is more properly called specific volume.
Less dense fluids float on more dense fluids if they do not mix. This concept can be extended, with some care, to less dense solids floating on more dense fluids. If the average density (including any air below the waterline) of an object is less than water (1000 kg/m3) it will float in water and if it is more than water's it will sink in water.
Density is a SI unit, and the formula for density is p=m/v (p being density)
So how is density applicable in our daily life?
Density becomes important anytime someone wants to build something where weight and distribution of weight are critical. Ships require ballast to stay upright in the water, airplanes use counterweights to ensure they fly correctly. In either case, during the initial design, engineers must account for how much weight they need, and how much space must be allotted for it. To determine how much space they need, they must know the density of the materials they plan on using.
Interesting Phenomenon of Density - The Dead Sea

We can all float in the Dead Sea because the salt concentration of the Dead Sea fluctuates around 31.5%. This is unusually high and results in a nominal density of 1.24 kg/L. Anyone can easily float in the Dead Sea because of natural buoyancy.
Reflection:
In the course of this project, I learnt on how to calculate density (p=m/v) with p being density and how to solve questions regarding the use of the formula of density. I also followed up on the laboratory lesson by searching on infomation about Density and how density is applicable in our daily lifes. This experience has also helped me to appreciate more phenomenons like the Dead Sea where the salt level is six times more than the typical sea. This laboratory lesson has also answered some of my questions when I was younger like: "Why does oil float on water" and other similiar questions.
Summary:
- Density is calcalated by P=M/V with P being density
- The mass density or density of a material is defined as its mass per unit volume The symbol most often used for density is ρ (the Greek letter rho)
- Density is a SI unit
- Density is applicable in our daily lives with examples such as planes needing counter weights to make sure the plane is stable and flys smoothly in the air
- We can all float in the dead sea due to density!
Lab lesson 7 (IP7)!
So this worksheet was "The Measurement of Time - Pendulum." I was at first confused with terms like oscillation period and etc, but I realised what they were went i searched GOOGLE! (:
So a pendulum.
yep^ confused me alot.
So a simpler one.
Applications of Pendulums in daily life:
Reflection:
- Inertial Guidance systems used in some aircraft instrumentation, missile guidance, and spacecraft.
- Seismographic instruments use a modification of the basic pendulum.
- Surveyors and construction workers use a pendulum [commonly called a "plumb bob"] to accurately locate their transits or levels over a specific spot on the Earth's surface.
- Some vehicle security systems use a modification of the pendulum principle to detect physical "shocks" to the vehicles, as would occur during a break-in.
Reflection:
Basically this experiment was not hard to do. Apart from the part that we you have to stop exactly when point A -> point B. Using a stop watch and the human reaction having a 0.3 second delay in reaction time, this resulting in inaccurate readings when the pendulum's period was timed. The other hard thing in this experiment was the rounding off. When the answer was 60.53cm, i should have rounded it off to one decimal point (60.5cm).
Another point to was that this experiment was a first for me so I gained much valuable insight and knowledge for this encounter
Summary:
Summary:
- A pendulum is a weight suspended from a pivot so that it can swing freely
- When a pendulum is displaced from its resting equilibrium position, it is subject to a restoring force due to gravity that will accelerate it back toward the equilibrium position.
Lab lesson 6 (IP6)!
So basically thits lab lesson was about measuring the height of the seat using vernier calipers. Learning how to use the vernier calipers wasnt easy at first as its not how your read a ruler + theres zero error so you have to +/-for the micrometer screw gauge.
Vernier Calipers

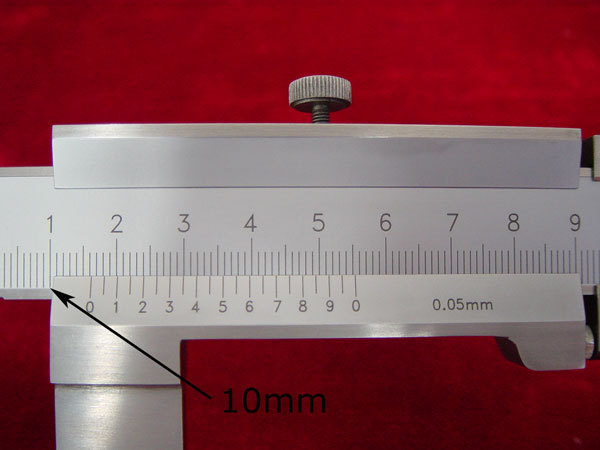
1), Read the centimeter mark on the fixed scale to the left of the 0-mark on the vernier scale. (10mm on the fixed caliper)
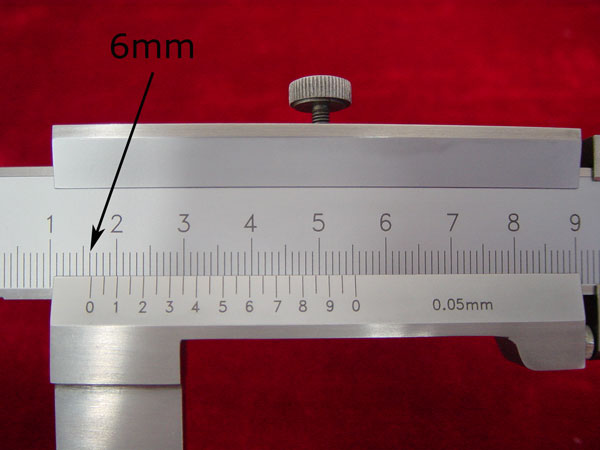
2). Find the millimeter mark on the fixed scale that is just to the left of the 0-mark on the vernier scale. (6mm on the fixed caliper)
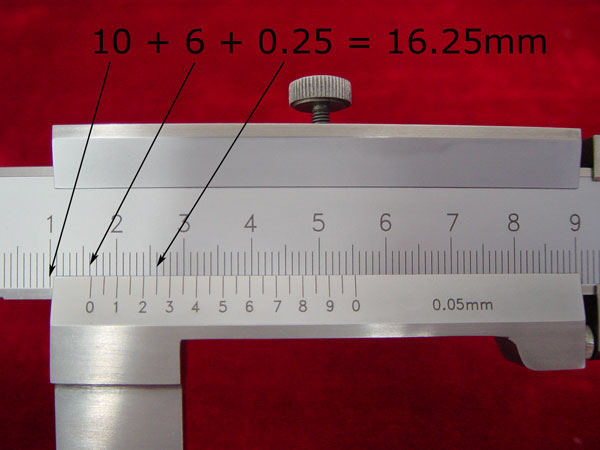
3). Look along the ten marks on the vernier scale and the millimeter marks on the adjacent fixed scale, until you find the two that most nearly line up. (0.25mm on the vernier scale)

4). To get the correct reading, simply add this found digit to your previous reading. (10mm + 6mm + 0.25mm= 16.25 mm)
4.Maintenance
Clean the surface of the vernier caliper with dry and clean cloth (or soaked with cleaning oil) and stock in a dry environment if it stands idle for a long time
Micrometer Screw Gauge


2). Find the millimeter mark on the fixed scale that is just to the left of the 0-mark on the vernier scale. (6mm on the fixed caliper)
3). Look along the ten marks on the vernier scale and the millimeter marks on the adjacent fixed scale, until you find the two that most nearly line up. (0.25mm on the vernier scale)
4). To get the correct reading, simply add this found digit to your previous reading. (10mm + 6mm + 0.25mm= 16.25 mm)
4.Maintenance
Clean the surface of the vernier caliper with dry and clean cloth (or soaked with cleaning oil) and stock in a dry environment if it stands idle for a long time
Micrometer Screw Gauge
In order to measure an object, the object is placed between the jaws and the thimble is rotated using the ratchet until the object is secured. Note that the ratchet knob must be used to secure the object firmly between the jaws, otherwise the instrument could be damaged or give an inconsistent reading. The manufacturer recommends 3 clicks of the ratchet before taking the reading. The lock may be used to ensure that the thimble does not rotate while you take the reading.
The first significant figure is taken from the last graduation showing on the sleeve directly to the left of the revolving thimble. Note that an additional half scale division (0.5 mm) must be included if the mark below the main scale is visible between the thimble and the main scale division on the sleeve. The remaining two significant figures (hundredths of a millimetre) are taken directly from the thimble opposite the main scale.
The reading is 7.38 mm.
The last graduation visible to the left of the thimble is 7 mm and the thimble lines up with the main scale at 38 hundredths of a millimetre (0.38 mm); therefore the reading is 7.38 mm.
Reflection:
This lesson taught me how to use the vernier callipers and micrometer screw gauge. Do not be deceived by their looks! Dont talk about calculating the measurements. They were much harder to use than I expected them to be even without zero error. Zero error only made things much worse. I wasnt really sure whether to +/- when i saw the zero error and just randomly guessed but after Mr Low explained, i knew how.
This lesson also teached me about the importance of precision as even if its 1mm off, you still get the answer wrong.
Lab lesson 3 (IP3)!
Lab lesson 3 (IP3)
`_____________________________,,,______________
_______´$$$$$$$`_________________________´$$$`
________`$$$$$$$`______,,________,,_______´$$$$´
_________`$$$$$$$`____´$$`_____´$$`____´$$$$$´
__________`$$$$$$$`_´$$$$$`_´$$$$$`__´$$$$$$$´a
´$$$$$$$$$`´$$$$$$$_$$$$$$$_$$$$$$$_$$$$$´_
´$$$$$$$$$$$$$$$$$$_$$$$$$$_$$$$$$$_$$$$$´_
___`$$$$$$$$$$$$$$$_$$$$$$$_$$$$$$_$$$$$$´_
______`$$$$$$$$$$$$$_$$$$$__$$_$$$$$$_$$´_
_______`$$$$$$$$$$$$,___,$$$$,_____,$$$$$´_
_________`$$$$$$$$$$$$$$$$$$$$$$$$$$$$$´_
__________`$$$$$$$$$$$$$$$$$$$$$$$$$$$´_
____________`$$$$$$$$$$$$$$$$$$$$$$$$´_
_______________`$$$$$$$$$$$$$$$$$$$$´_
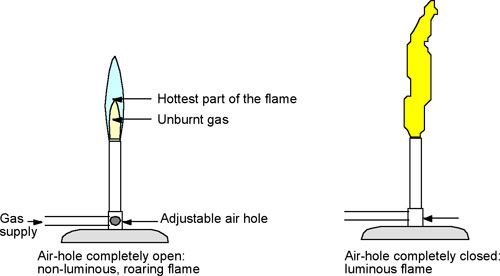
Difference between luminous flames and non-luminous flames. Kinda hard to remember though.
The first has a yeallow flame whilt the latter has a blue/clear flame.
for heating you want non-lumnous flame for efficiency - light is lost energy from the burning process.
All you need to produce a non-luminous flame is some way to get a lot of oxygen to the flame. You can also do it by burning up a compound that doesn’t need as much oxygen to burn. Examples of things that can produce non-luminous flames include the bunsen burners (which generally burn methane) . The torches that the olympic runners carry are also sometimes non-luminous. Examples of luminous flames are the more familiar ones - burning wood, candles, etc.
Fun fact - The flame of the actual Olympic cauldron is also typically luminous.
Reflection:
Although in this laboratory lesson, i did not really notice the difference between a luminous flame and a non-luminous flame but after the teacher telling us what to watch out for and STARING INTENTLY at the flame did I notice what the teacher was talking about.
I actually thought the non-luminous flame would not be as hot was the luminous flame as non sounded as if it was not so yeeahh. Furthermore, non-luminous flames are coloured in blue. Blue=water? :O
After this laboratory leson i could tell the difference pretty easily
_______´$$$$$$$`_________________________´$$$`
________`$$$$$$$`______,,________,,_______´$$$$´
_________`$$$$$$$`____´$$`_____´$$`____´$$$$$´
__________`$$$$$$$`_´$$$$$`_´$$$$$`__´$$$$$$$´a
´$$$$$$$$$`´$$$$$$$_$$$$$$$_$$$$$$$_$$$$$´_
´$$$$$$$$$$$$$$$$$$_$$$$$$$_$$$$$$$_$$$$$´_
___`$$$$$$$$$$$$$$$_$$$$$$$_$$$$$$_$$$$$$´_
______`$$$$$$$$$$$$$_$$$$$__$$_$$$$$$_$$´_
_______`$$$$$$$$$$$$,___,$$$$,_____,$$$$$´_
_________`$$$$$$$$$$$$$$$$$$$$$$$$$$$$$´_
__________`$$$$$$$$$$$$$$$$$$$$$$$$$$$´_
____________`$$$$$$$$$$$$$$$$$$$$$$$$´_
_______________`$$$$$$$$$$$$$$$$$$$$´_
Difference between luminous flames and non-luminous flames. Kinda hard to remember though.
The first has a yeallow flame whilt the latter has a blue/clear flame.
for heating you want non-lumnous flame for efficiency - light is lost energy from the burning process.
All you need to produce a non-luminous flame is some way to get a lot of oxygen to the flame. You can also do it by burning up a compound that doesn’t need as much oxygen to burn. Examples of things that can produce non-luminous flames include the bunsen burners (which generally burn methane) . The torches that the olympic runners carry are also sometimes non-luminous. Examples of luminous flames are the more familiar ones - burning wood, candles, etc.
Fun fact - The flame of the actual Olympic cauldron is also typically luminous.
Reflection:
Although in this laboratory lesson, i did not really notice the difference between a luminous flame and a non-luminous flame but after the teacher telling us what to watch out for and STARING INTENTLY at the flame did I notice what the teacher was talking about.
I actually thought the non-luminous flame would not be as hot was the luminous flame as non sounded as if it was not so yeeahh. Furthermore, non-luminous flames are coloured in blue. Blue=water? :O
After this laboratory leson i could tell the difference pretty easily
Lab lesson 2 (IP2)!
So in this lesson, we learnt about the anatomy of a bunsen burner.
so, basically a bunsen burner consists of a
so, basically a bunsen burner consists of a
- barrel and collar
- an air-hole
- a gas jet
- a base
- a gas top
Lighting the bunsen burner.
Seemed kind of scary at first, flames might just like EXPLODE and eat you up. Nah, just joking but still kind of scary.
CAUTION !!!!! Before you light the burner, check to see that you and your partner have taken the following safety precautions against fires: Wear safety goggles, aprons, and gloves. Confine long hair and loose clothing: Tie long hair at the back of the head and away from the front of the face, roll up long sleeves on shirts, blouses, and sweaters away from the wrists. You should also know the locations of fire extinguishers,f ireblankets,safety showers, and sand buckets and how to use them in case of a fire.  Figure 1-1 2. In lighting the burner, partially close the ports at the base of the barrel, turn the gas full on, hold the sparker about 5 cm above the top of the burner, and proceed to light. The gas flow may then be regulated by adjusting the gas valve until the flame has the desired height. If a very low flame is needed, remember that the ports should be partially closed when the gas pressure is reduced. Otherwise the flame may burn inside the base of the barrel. When improperly burning in this way, the barrel will get very hot, and the flame will produce a poisonous gas, carbon monoxide. CAUTION!!!! (again) Carbon monoxide is a poisonous gas. If the flame is burning inside the base of the barrel, immediately turn off the gas at the gas valve. Do not touch the barrel, for it is extremely hot! Allow the barrel of the burner to cool off. Reflection: For this laboratory lesson, we have learnt more about the Anatomy of a Bunsen Burner and what we should do will lighting the burner. At first, being mischievous, despite the teacher's warnings, I wanted to see what a strike back looked like, however, it seemed like I was not the only one. Another one of my classmates also did it and I saw that it was no laughing matter :/. I previously had a little phoebia of setting things on fire but this laboratory lesson taught me how to use the lighter safely. The precautions that needed to be heeded were also learnt by me in this labarotary lesson.. |
hello (: Lab lesson 1 (1P1)!
Welcome to my E-portfolio, this lesson was basically about the instruments the laboratory and the various safety rules in the lab. It was kind of dry but these are the basic necessities to know in case of emergency.

Basic Stuff of a lab -
Here are some of the items found in the laboratory:
1) Work benches
2) Gas taps
3) Fire extinguishers
4)Rubbish bins
5)Doors
6)Fire blanket
7)Teacher’s desk
8)Fume cupboard
9)First Aid Box
10)Shower
11)Laboratory rules
12)Empty bucket
And here are some tools:
1)Bunsen Burner
2)Tripod stand
3)Wire Gauze mat
4)Beaker
5)Stirring rod
6)Evaporating dish
7)Conical flask
8)Pipette
9)Flat-bottomed flask
10)Test tube
11)Test tube holder
12)test tube rack
13)Spatula
14)Retort stand
15)Filter funnel
16)Tongs
17)Safety Glasses
18)Burette
19)Thistle funnel
20)Measuring cylinder
Subscribe to:
Comments (Atom)